See every client's files in one list, check what clients sent you, restore deleted files from the recycle bin and set the folders every client starts with.
In short:Documents in the left menu shows the files of all your clients in one place: the newest files, each client’s file count, what clients sent you through the portal, and the recycle bin. To sort one client’s files into folders, use that client’s Files tab.
The Documents page: tabs, search and filters
The four tabs
Tab
What it shows
All files
Every file added to a client or work item, newest first, with its client, folder, who added it, date and size.
All clients
Each client with how many files they have. Clients with new uploads come first. Click Open files to go to that client’s Files tab.
From clients
Files your clients sent through the client portal. New means nobody on your team has opened it yet.
Recycle bin
Deleted files. They stay here for 90 days, then they are erased for good.
Find a file
Click Documents in the left menu.
Type in Search file, client or folder.
Narrow the list with Added (for example Added: last 7 days) and Type (PDF, Word / text, Excel / CSV, Photos, Other). On From clients, the Show box picks new or not-filed files, new only, not filed, or everything.
The ⋮ at the end of a row has Preview, Download, File to… (put the file in one of the client’s folders) and Delete.
Work with several files at once
Tick the box in front of each file. A bar shows N selected with File to…, Download (.zip) and Delete. On From clients you can also Mark as seen.
Restore a deleted file
Open Documents > Recycle bin. Each file shows when it was deleted, by whom and how many days are left.
Click the ⋮ on the file’s row and choose Restore.
Admins also see Erase now, which deletes the file for good straight away. This can’t be undone.
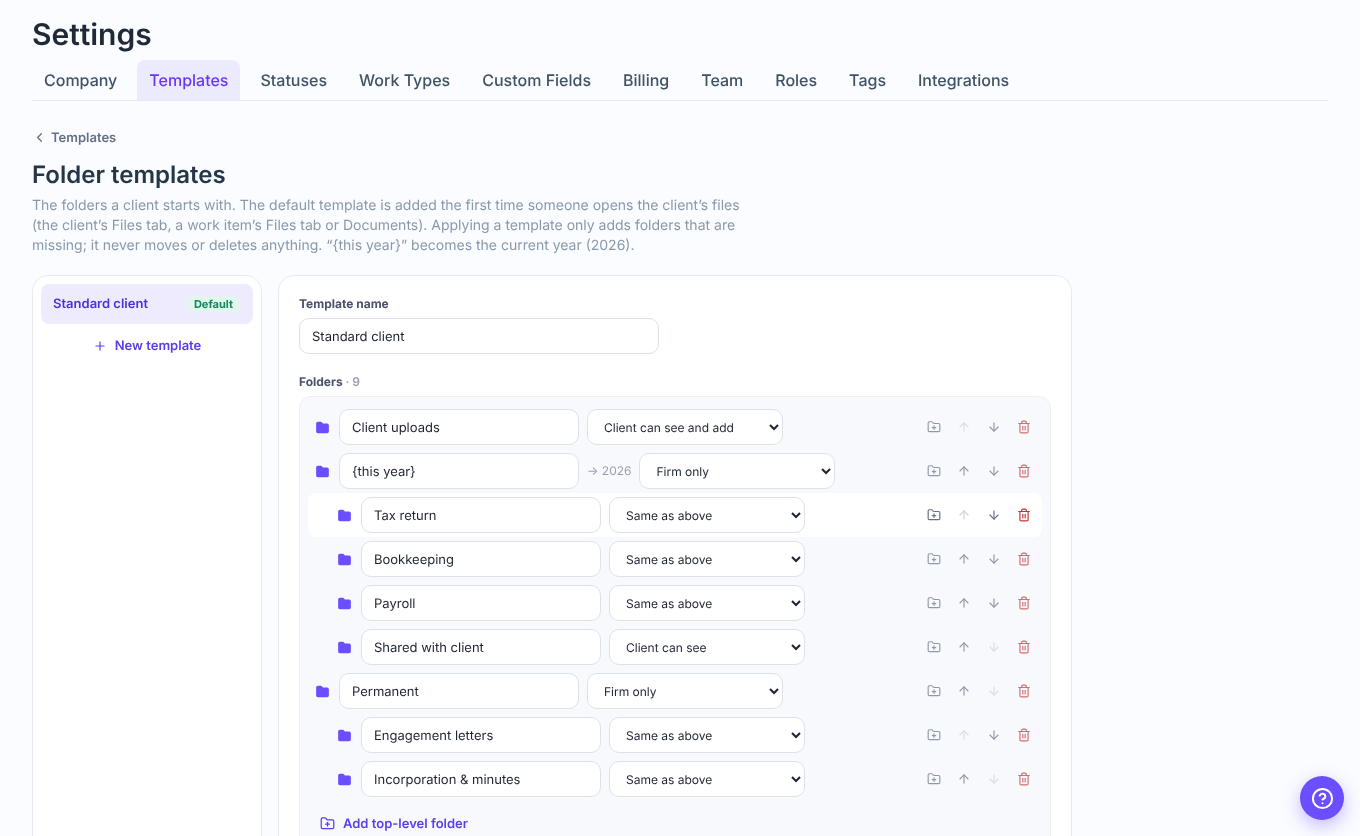
Set the folders every client starts with
Admins (and people with the View Settings permission) can change the standard folders.
Click your avatar > Settings > Templates > Folder templates.
Click a template (your firm starts with Standard client) or New template.
Add folders with Add top-level folder or the folder icon on a row, and choose for each who can see it: Firm only, Client can see, Client can see and add, or (for a folder inside another) Same as above.
Type {this year} in a folder name to get the current year. Turn on Add next year’s folders in January to add the new year’s folders automatically.
Turn on Use for every new client to make it the default, then click Save template.
To add the folders to clients who already have files, click Apply to existing clients…. It only adds missing folders; it never moves or deletes anything.
Settings > Templates > Folder templates
Save an email attachment to a client
On the Email page, open an email with an attachment and click Save to client files on the attachment. Pick the Client and the Folder, then click Save.
Tips
The default folders are added the first time someone opens a client’s files (the client’s Files tab, a work item’s Files tab or Documents).
Opening a client’s upload marks it as seen for everyone, so the New tag goes away.