
Work items
Subtasks and subtask templates
Break work into steps with subtasks, and save time with subtask templates that fill in the steps, assignees, budgets and automations for you.
Prepare return, Review. A subtask template is a ready-made list of steps you can reuse. Each step in a template can already have an assignee, a time budget and an automation.
Add a subtask to a work item
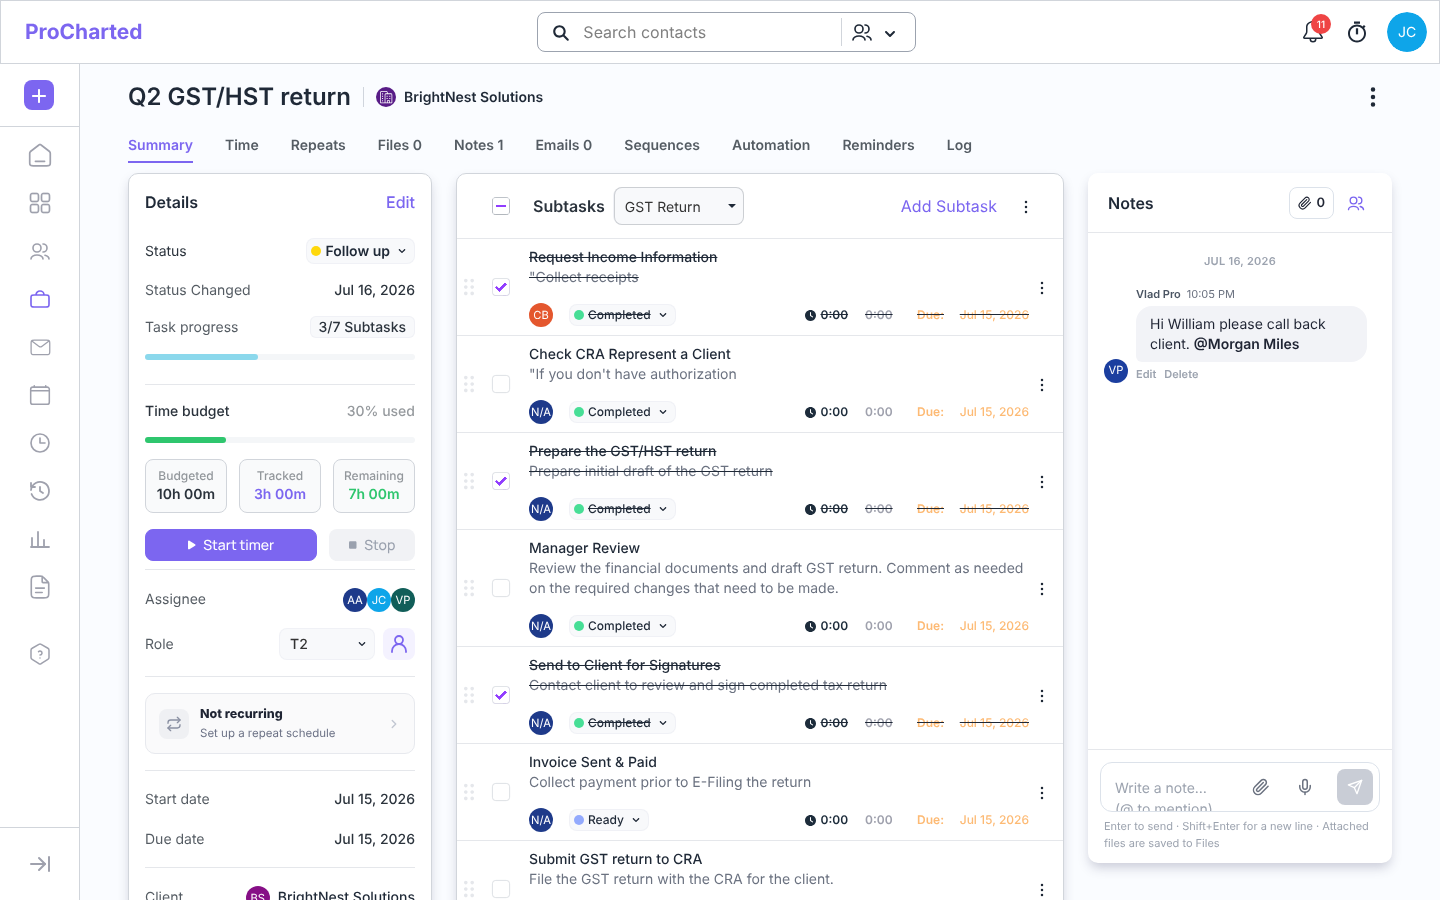
- Open the work item. The Subtasks list is in the middle of the Summary page.
- Click Add Subtask.
- Type the title (“Add subtask title…”) and, if you like, a description.
- Choose who does it under Assigned to (required; it’s you by default) and, if you like, a Due date.
- Click Add.
Drag a subtask by its handle (⋮⋮ on the left) to change the order.
The ⋮ next to Add Subtask has two shortcuts to Settings: Edit existing template (opens the template this work item uses) and Create new template (opens a new, empty template). Changing a template there doesn’t change this work item’s subtasks.
Work with subtasks
Each subtask shows its assignee, a status, its own timer and a due date. Its ⋮ menu has
Edit, Automation and Delete.
- Tick the checkbox when a step is done. The subtask’s status changes to Completed and its title is crossed out.
- Tick everything at once: the checkbox next to the Subtasks title ticks every subtask, sets each one to Completed and sets the work item to Completed. When only some subtasks are ticked, that box shows a dash.
- When all subtasks are ticked, the work item’s status changes to Completed too, as long as the work type has a Completed status. You can still change any status by hand.
- Task progress on the work item (for example “3/7 Subtasks”) counts the ticked subtasks.
- A yellow ⚡ next to a subtask’s title means it has an automation. Hover over it to read the rule.
- Time tracked on a subtask’s timer counts toward the work item’s Tracked time.
Want a budget per step? On the work item, click Budgeted in the Time budget box to open
Edit Budget and set the hours per subtask.
Create a subtask template
- Click your avatar > Settings > Templates > Subtask templates.
- Click New Template (or click an existing template to edit it).
- Under Template Details, fill in the Title and, if you like, a Description (optional). The Template Status switch makes the template Active or inactive.
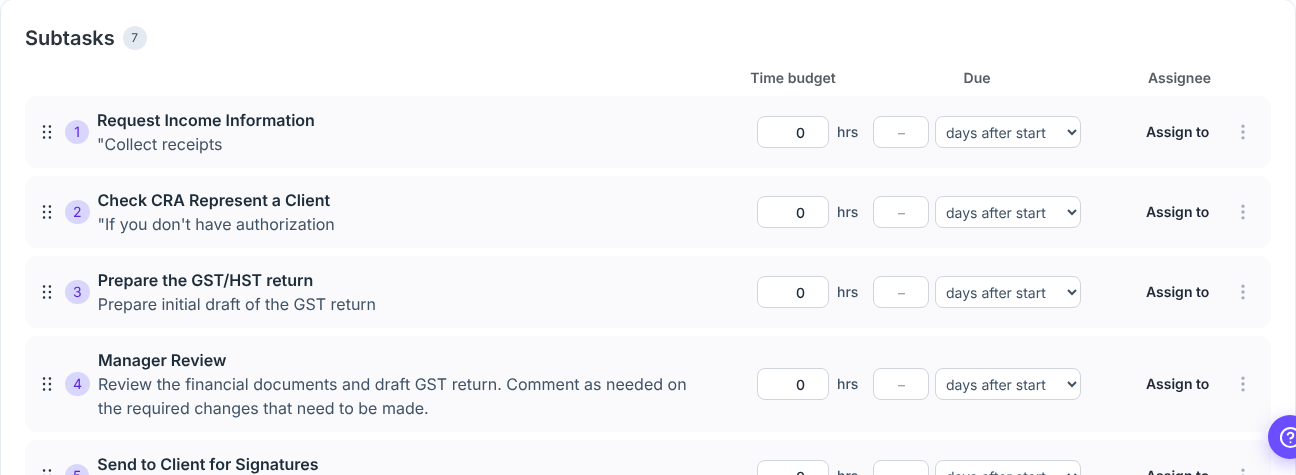
- Click Add Subtask, type the title in the “Add subtask title…” box and, if you like, a description in “Add a description (optional)”. Confirm with ✓ (or x to cancel). While you’re adding a step, the Add Subtask button is hidden; it comes back when you confirm. Repeat for each step. For each step you can right away:
- set a Time budget in hours,
- set when it is Due: type a number of days and choose days after start or days before due (leave it empty to use the work’s due date),
- click Assign to to choose who does it (once chosen, the step shows that person’s avatar; click it to change), and
- add an automation: the step’s ⋮ menu > Add Automation. The same menu has Edit, Delete Automation (once a step has one) and Delete.
You don’t need to save the template first. 5. Click Add Template (new template) or Save Changes (existing template).
Your firm starts with a set of ready-made templates. Turn off the ones you don’t use rather than deleting them. The list also has Import Template.
Manage your templates
The Subtask Templates list (Settings > Templates > Subtask templates) shows All templates at first; switch to Active or Inactive at the top. The columns are
Templates, Description, Tasks, Status and Date Created. Templates are listed in alphabetical order (numbers first).
A template’s ⋮ menu has Edit, Activate or Deactivate, Duplicate and
Delete.
To copy a template:
- Open its ⋮ menu and click Duplicate. The Copy Template window opens with the name filled in as “
(Copy)” . - Change the name if you like and click Copy. Nothing is copied until you click Copy.
Use a template when creating work
- In the New work window, choose the template in Subtask Template. If the work type has a Default Subtask Template, it’s already filled in.
- Create the work. The template’s steps are added as subtasks.
Who gets each subtask:
- If a step in the template has its own assignee, that person gets it. For example, if the Review step is assigned to Jane in the template, Jane gets it even if the work item is assigned to someone else.
- If a step has no assignee, it goes to the work item’s assignee(s). With two assignees, both get every such subtask.
Each subtask’s due date comes from the template: for example 5 days after start is the work’s start date plus 5 days, and 3 days before due is the work’s due date minus 3 days. Steps without days are due on the work’s due date. Changing the work’s dates later doesn’t move these subtask due dates.
Automations saved on the template’s steps are copied to the work’s subtasks. On the work item, the top of the Subtasks card shows which template was used (for example
Sales Tax Return).
Tips
- Set a Default Subtask Template on a work type (Settings > Work Types) so it fills in automatically. On the same page, Default Due Date (days after start) fills in the work’s due date in the New work window.
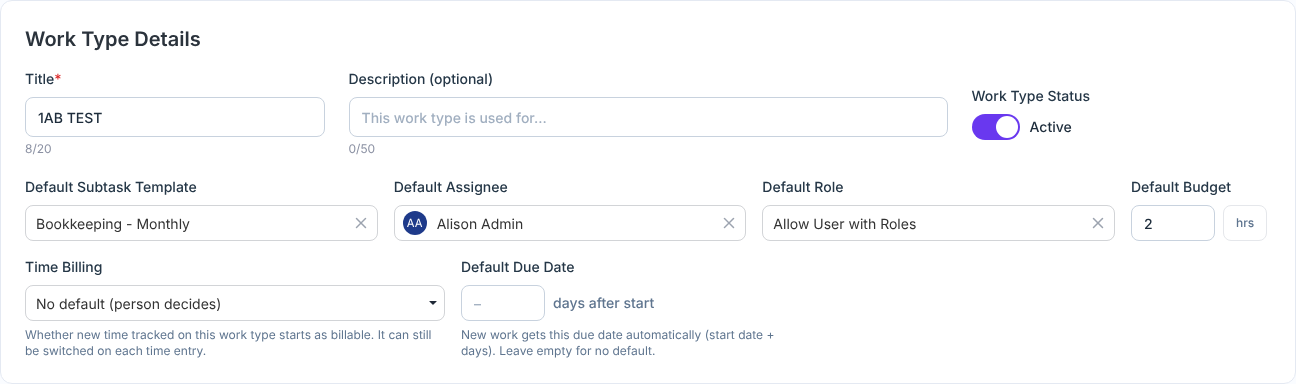
- Turn Template Status off to stop offering a template for new work without deleting it.
- Changing a template doesn’t change work that was already created with it.
Related articles
- Inside a work item
- Create new work
- Work types: defaults, automations and statuses
- Automations: let ProCharted do the routine steps
- Email templates