
Work items
Create new work
Create a work item for one or many clients, assign it to people or a role, set dates and budget, and add a repeat schedule, automation or email sequence.
Open the New work window
Any of these opens it:
- Work page > + Create Work (top right).
- The purple + at the top of the left menu > New Work.
- Contacts list: tick one or more clients, then click Create work in the bar that appears. Those clients are already filled in.
Fill in the work
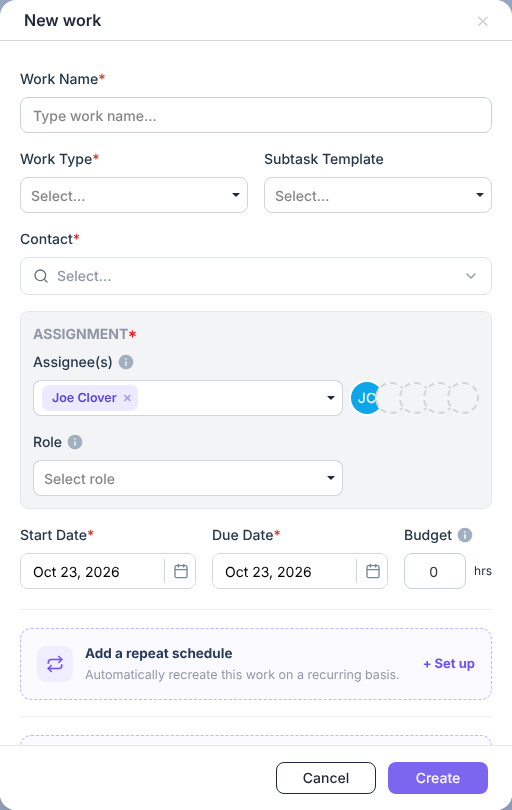
- Work Name – e.g. 2026 Personal tax return.
- Work Type – e.g. Personal Tax Return. If the work type has defaults, they fill in for you: subtask template, assignee, role, budget and due date (set in Settings > Work Types). You can change them.
- Subtask Template (optional) – adds a ready-made list of steps.
- Contact – who the work is for:
- Contacts tab: tick one or more clients (use the search box), then Done.
- Tags tab: pick a tag to create the work for every client with that tag.
With more than one client you’ll see “A separate work item will be created for each contact”: each client gets their own copy, with the same work type, template, assignees, role and budget. 5. Assignment – choose Assignee(s) and/or a Role. You need at least one of the two. – Assignee(s): up to 5 people. You are filled in by default. – Role: work assigned to a role waits in Queued until someone in it picks it up. To make a new role, pick Create role at the top of the list (needs Settings access). 6. Start Date and Due Date – both are required and start as today. Dates are shown like Oct 23, 2026; type a date or click the calendar icon to pick one. The start date must be on or before the due date. If the work type has a Default Due Date (for example 30 days after start), the due date is filled in for you. 7. Budget (optional) – the hours planned for this work.
Optional extras
Below the dates are three optional cards. Each has a + Set up button:
- Add a repeat schedule – “Automatically recreate this work on a recurring basis.” Set up the schedule in the Recurring work window and click Save. With Immediately, the window tells you how many work items will be made (for example “Saving creates 8 work items at once.”). See Recurring work.
- Add an automation – “Trigger an action automatically based on this work’s status.” For example, when the due date is reached, notify a teammate. If you also set a repeat schedule, the automation is copied to each new work item in the series. See Automations.
- Add an email sequence – “Automatically email the client when this work starts.” Pick a contact first; until then the card says “Pick a contact first.” With several clients, each one gets its own sequence, sent to their primary email. See Email sequences.
Nothing starts until you click Create: the schedule, automation and sequence are then set up on every work item that is created.
Then click Create.
Which status new work gets
- If the start date is today or earlier, the new work starts as Ready.
- If the start date is in the future, it starts as Scheduled and switches to Ready on its start date (within a day), together with its subtasks.
- You can change the status by hand at any time.
Tips and common mistakes
- “Select a role or at least one assignee” – fill in the Assignment box.
- “Invalid Dates” – the start date is after the due date. Change one of them.
- Subtasks from a template go to the work’s assignee(s), unless the template step has its own assignee.
- If a message says the work was created but the automation or email sequence wasn’t added, open the work item and add it from its Automation or Sequences tab.
Related articles
- Inside a work item
- The Work page: find and manage your firm’s work
- Work types: defaults, automations and statuses
- Subtasks and subtask templates
- Roles and the Queued list: share work with a team
- The client list – search, filter, bulk actions and importing